Return to Help Index
| Buyer's Guide | |||||||||||||||||||||||||||||||||||||||||
 |
|||||||||||||||||||||||||||||||||||||||||
| Part 1 of 4: Buying a 10-Year-Old 19' Electric Scissor Lift at Auction | What a Contractor Should Budget For | |||||||||||||||||||||||||||||||||||||||||
Part 1 of 4: Buying a 10-Year-Old 19' Electric Scissor Lift at Auction – What a Contractor Should Budget ForIf you’re an electrician (or any contractor) who just bought a 10-year-old Genie GS-1930 or JLG 1930ES 19' electric scissor lift at auction, this four-part series will walk you through most everything you need to get it safe, legal, and ready for the job site. In Part 1 we cover the initial purchase and the big-ticket inspections and parts you’ll need right away. You’re walking the equipment auction and you score a 10-year-old 19' electric scissor lift (Genie GS-1930 or JLG 1930ES) showing only 450–850 hours on the meter. Important note: Hour meters on electric scissor lifts are notoriously low and do not accurately reflect real usage. The meter only runs when the drive motor is engaged (i.e., when the machine is actually driving). It does not count time spent elevated, raising/lowering the platform, or performing stationary work at height. So a reading in the 450–850 hour range on a 10-year-old machine is actually very common and often means heavier real-world use than the number suggests. On any 10-year-old electric scissor lift like the GS-1930 / 1930ES, the biggest items that almost always need immediate attention are the batteries, hydraulic fluid and filters, and decals. The JLG GS-30 series and Genie preventive maintenance tables call for quarterly and annual checks on electrical systems, hydraulics, platform, and chassis. Cost Assumptions (OEM Parts from gciron.com)
All recommended OEM parts are available for purchase directly at www.gciron.com. Immediate Post-Purchase Costs + First-Year Ownership
Bottom Line for ContractorsPlan on investing roughly $2,300–$2,500 in the first 30 days to make your auction GS-1930 / 1930ES safe, legal, and ready for the jobsite. After that initial catch-up, expect $1,600–$2,000 per year for routine inspections and consumables. While it adds to the upfront cost, owning a well-maintained 19' electric scissor lift is almost always cheaper than renting one for every electrical, drywall, or low-level interior job. Next week in Part 2: We’ll cover the most important maintenance items on an electric scissor lift — battery care, charging, water levels, and replacement. |
|||||||||||||||||||||||||||||||||||||||||
| Part 1 of 4: Buying a 10-Year-Old 660SJ Boom Lift at Auction – What a Roofer Should Budget For | |||||||||||||||||||||||||||||||||||||||||
Part 1 of 4: Buying a 10-Year-Old 660SJ Boom Lift at Auction – What a Roofer Should Budget ForIf you are a roofer (or any contractor) who just bought a 10-year-old 660SJ at auction, this four-part series will walk you through everything you need to get it safe, legal, and ready for the jobsite. In Part 1 we cover the initial purchase and the big-ticket inspections and parts you’ll need right away. You’re walking the equipment auction and you score a 10-year-old 60-foot boom lift (660SJ model) with 4,121 hours on the clock. That’s right around the average for machines this age, making it a realistic and common purchase. But before your crew is 60 feet in the air hanging off a roof, this Aerial Work Platform (AWP) still needs to be brought up to current safety standards. On any 10-year-old unit like the 660SJ, two items almost always need prompt replacement: the boom extend/retract cables (wire rope) and the wear pads. Most manufacturers recommend replacing the cables at 12 years or 7,000 hours. At 10 years old, it’s best practice to renew both — even at average hours — to keep the boom operating smoothly and safely. The standard AWP inspection checklists cover decals, structural welds, controls, brakes, and hydraulic cylinders. You’ll also run a full cylinder drift test as part of the annual inspection. Cost Assumptions (OEM Parts from gciron.com)
Immediate Post-Purchase Costs + First-Year Ownership
Bottom Line for RoofersPlan on investing roughly $6,900–$7,200 in the first 30 days to make your auction 660SJ safe, legal, and ready for the jobsite. After that initial catch-up, expect $3,500–$4,500 per year for routine inspections and consumables. While it adds to the upfront cost, a properly maintained AWP boom lift on your own truck is almost always cheaper than renting one for every roofing job. Next week in Part 2: We’ll cover the cylinder drift test in detail — why it matters on a 10-year-old machine and exactly how to check it. |
|||||||||||||||||||||||||||||||||||||||||
| Part 1: Buying a 10-Year-Old SkyTrak 10054 Telehandler at Auction | |||||||||||||||||||||||||||||||||||||||||
Part 1 of 4: Buying a 10-Year-Old SkyTrak 10054 Telehandler at Auction – What a Contractor Should Budget ForIf you’re a general contractor, roofer, or steel contractor who just bought a 10-year-old SkyTrak 10054 telehandler at auction, this four part series will walk you through everything you need to get it safe, legal, and ready for the jobsite. In Part 1 we cover the initial purchase and the big ticket inspections and parts you’ll need right away. You’re walking the equipment auction and you score a 10-year-old SkyTrak 10054 telehandler with typical real world usage. Important note on hour meters: The SkyTrak 10054 hour meter records engine operating time. Typical yearly usage for a telehandler is 600-800 hours. On any 10-year-old SkyTrak 10054, the biggest items that almost always need immediate attention are the battery, hydraulic fluid and filters, boom wear pads / chain tension, decals, and the load chart booklet. The factory service schedule calls for frequent checks on hydraulics, boom, chassis, and engine systems. Also note that manuals distinguish between ULS (Ultra Low Sulfur – S ≤ 15 mg/kg) diesel engines built for the US market and LS (Low Sulfur – S ≤ 500 mg/kg) engines built for export markets with lower-quality fuel (common in many Caribbean islands and other regions). Cost Assumptions (OEM Parts from gciron.com)
All recommended OEM parts and fluids are available for purchase directly at www.gciron.com. Immediate Post-Purchase Costs + First-Year Ownership
Bottom Line for ContractorsPlan on investing roughly $4,000–$4,300 in the first 30 days to make your auction SkyTrak 10054 safe, legal, and ready for the jobsite. After that initial catch-up, expect $3,000–$4,500 per year for routine inspections and consumables (higher than a scissor lift because of the larger hydraulic system and boom). While it adds to the upfront cost, owning a well-maintained SkyTrak 10054 telehandler is almost always cheaper than renting one for every framing, roofing, steel erection, or material-handling job. Next week in Part 2: We’ll cover boom maintenance, hydraulic system service, and the critical wear pads / chain tension checks that keep the 54 ft boom safe and smooth. |
|||||||||||||||||||||||||||||||||||||||||
| Part 2 of 4: Battery Care and Maintenance on Your 10-Year-Old 19' Electric Scissor Lift – The #1 Thing You Must Get Right | |||||||||||||||||||||||||||||||||||||||||
Part 2 of 4: Battery Care and Maintenance on Your 10-Year-Old 19' Electric Scissor Lift – The #1 Thing You Must Get RightLast week in Part 1 we covered what it really costs to buy and initially set up a 10-year-old Genie GS-1930 or JLG 1930ES 19' electric scissor lift. If you’re an electrician (or any contractor) who just bought one of these machines, the single most important thing you need to focus on right now is battery care. Unlike a boom lift, an electric scissor lift has no engine — everything runs on batteries. If the batteries are weak, sulfated, or poorly maintained, the machine will lose performance, shut down unexpectedly, or leave you stranded 19 feet in the air. On 10-year-old units this is the #1 cause of downtime. Why Batteries Matter So Much on These MachinesThe Genie GS-1930 and JLG 1930ES use four 6-volt deep-cycle batteries wired in series (24V system). OEM batteries and the original charger are designed to work together — using mismatched or aftermarket batteries can reduce performance and shorten lifespan.
For the JLG 1930ES the correct OEM battery is Part #0400215.
→
Buy JLG OEM 6V Battery here 
JLG Setup 
Genie Setup Daily / Weekly Battery Checks (Do These Yourself)⚠️ Safety Warning: Batteries produce explosive gases and can explode and ignite. Always wear safety goggles and work in a well-ventilated area when inspecting or replacing batteries.
Quarterly / Annual Battery Maintenance
When to Replace the Battery SetOn a 10-year-old machine you will almost always need a new set of batteries. Realistic current cost (from gciron.com):
Bottom Line for ContractorsBatteries are the heart of your 19' electric scissor lift. Spend the time and money to get them right in the first 30 days (already built into the $2,300–$2,500 budget from Part 1). New OEM properly maintained batteries will last 5 years. A well-maintained battery set will give you reliable daily performance and save you from surprise downtime on the jobsite. Next week in Part 3: We’ll cover safety decals, placards, and overall machine appearance — the small but critical items that keep you compliant with OSHA and your insurance company. |
|||||||||||||||||||||||||||||||||||||||||
| Part 2 of 4: Boom Maintenance & Hydraulic Service on Your 10-Year-Old SkyTrak 10054 Telehandler | |||||||||||||||||||||||||||||||||||||||||
Part 2 of 4: Boom Maintenance & Hydraulic Service on Your 10-Year-Old SkyTrak 10054 TelehandlerLast week in Part 1 we covered what you should budget for right after buying a 10-year-old SkyTrak 10054 at auction. Now that the machine is mechanically sound on the basics, it’s time to focus on the boom and hydraulic system — the heart of the telehandler. On a 10-year-old 10054, these are the areas that see the most wear and are responsible for the majority of downtime if neglected. Boom Wear Pads (Critical Item)The SkyTrak 10054 uses flat rectangular wear pads with metal inserts. There are 47 wear pads installed on the boom sections.
Recommended OEM Part:
Proper Installation & Shimming Use shims and spacers as needed. A spacer must be used before any shim. Torque wear pad bolts (3/8-16) to 31 lb-ft (42 Nm) after shimming is complete. Use Loctite® 242™ on all mounting bolts. Pro Tip: Use shims to maintain the proper clearance between boom sections for as long as possible. Only replace the wear pads when you can no longer achieve the correct clearance with shimming. Lubrication: Clean and lightly grease all wear pad pathways and the hose carrier guide bar pathways with Mystik Tetrimoly NLGI Grade 2 grease after installation. Boom Chain Inspection & MaintenanceThe boom extend and retract chains are critical safety components. A chain failure can result in loss of load control or machine instability. Inspection Intervals:
How to Inspect:
What to Check:
Important Rule:
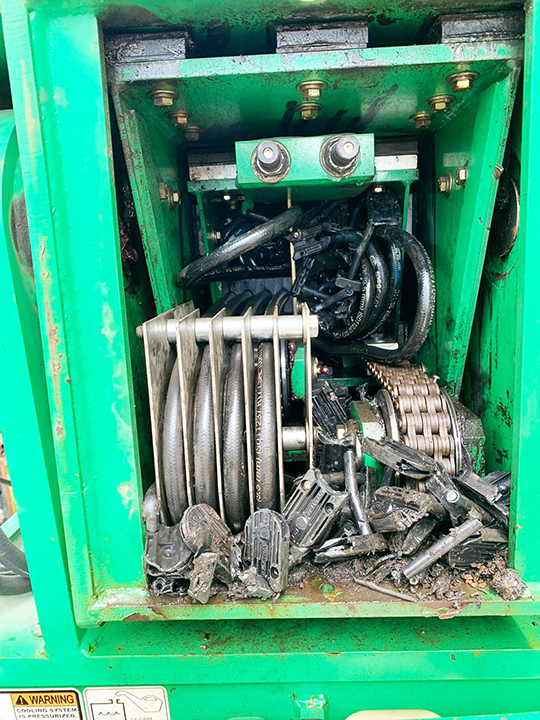
Recommended Lubricant: Boom Hose Carrier AssemblyThis is one of the most common replacement items on older SkyTrak 10054 telehandlers. When you see damage like the photo below, it’s time to replace the entire assembly.
Recommended OEM Part: Hydraulic System ServiceThe 10054 uses the same 10W-30 hydraulic fluid (such as MobilFluid 424) in the transmission, transfer case, axles, wheel ends, and the main hydraulic system.
This is a very common service to perform early on a 10-year-old machine. Lubrication Schedule (10054 Specific)
Bottom Line for ContractorsThe boom on a 10-year-old SkyTrak 10054 is where you’ll spend the most time and money if it’s not maintained properly. Focusing on proper wear pad shimming, regular chain inspection (with the 3% elongation rule), and replacing the boom hose carrier assembly when needed will keep the machine working reliably and reduce expensive (and dangerous) downtime. Next week in Part 3: We’ll cover safety decals, appearance, structural inspection points, and keeping the machine compliant and insurable. |
|||||||||||||||||||||||||||||||||||||||||
| Part 2 of 4: Cylinder Drift Test on 10 Year-Old 660SJ Boom Lift | |||||||||||||||||||||||||||||||||||||||||
Part 2 of 4: Cylinder Drift on Your 10-Year-Old 660SJ Boom Lift – Why It Matters and How to Test ItLast week in Part 1 we covered buying that 10-year-old 660SJ at auction and the major upfront costs. If you’re a roofer (or any contractor) who just bought one of these machines, one of the very first things any good mechanic will check is cylinder drift. On a 10-year-old unit this test is critical — even with low hours, worn seals or valves can create a real safety risk when your crew is 60 feet in the air. Cylinder drift is when the boom rod slowly moves (extends or retracts) even though the control valve is in neutral. It’s one of the most common issues on older AWPs, and catching it early keeps the machine safe and prevents bigger repair bills later. What Causes Cylinder Drift?
How to Run the Cylinder Leakage TestThe test must be done with the hydraulic oil at stabilized ambient (shop) temperature. Here’s the simple procedure:
If the drift stays within the limits shown in the table below, the leakage is acceptable. Anything over the limit means it’s time to inspect (and likely replace) the piston seals and/or load-holding valves. Table: Maximum Acceptable Cylinder Drift in 10 Minutes
Note: These limits are based on a normal leakage rate of about 6 drops per minute. Thermal Drift vs. Real LeakageAll hydraulic oil expands and contracts with temperature changes. On a 10-year-old 660SJ that’s been sitting, you may see the boom creep slightly as the oil moves toward outside air temperature. This is normal and more noticeable on longer booms. What If the Drift Test Fails?If the numbers are over the limit, you’ll most likely need new piston seals. On the 660SJ there are two typical cylinders to check:
Both are genuine OEM parts available directly at www.gciron.com. Replacing one or both kits plus labor usually adds $1,500–$3,000 depending on which cylinder is leaking. Bottom Line for RoofersHave the cylinder drift test done as part of the first annual inspection (already included in the $6,900–$7,200 first-30-days budget from Part 1). If it passes, you’re good to go. If it fails, the seal kits above are the most common fix and are straightforward to order from gciron.com. Next week in Part 3: We’ll cover safety decals, paint, and appearance — the small but important details that keep you compliant with OSHA and your insurance company. |
|||||||||||||||||||||||||||||||||||||||||
| Part 3 of 4: Safety Decals & Appearance on Your 10-Year-Old SkyTrak 10054 Telehandler | |||||||||||||||||||||||||||||||||||||||||
Part 3 of 4: Safety Decals & Appearance on Your 10-Year-Old SkyTrak 10054 TelehandlerLast week in Part 2 we covered boom wear pads, chain inspection, and hydraulic service. Now that the machine is mechanically sound, it’s time to focus on safety decals, appearance, and compliance — the items that keep the machine legal, insurable, and safe to operate. On a 10-year-old SkyTrak 10054, decals fade, peel, or go missing over time. Missing or illegible decals can cause issues during inspections, and an outdated or missing load chart can create serious liability. Why Decals and Appearance Matter
Decal Inspection & ReplacementWalk around the machine and check all decal locations, especially:
Complete Decal Kits by Serial Number:
These kits include decals for the boom and frame. Note: These kits do not include the load chart. Individual Popular Decals: Cab / Dash Decals (install at the dash):
Lubrication Chart Decal: Tip: On older 10054s, the cab/dash decals and the lubrication chart are two of the most commonly faded or missing items. Replacing them makes a big visual difference and helps with compliance. Load Chart Booklet (Very Important)The load chart shows the machine’s lifting capacity at different boom positions and must match the machine’s current configuration.
Recommended Part: MirrorsCracked or missing mirrors are a common issue on older telehandlers and can fail a safety inspection. Recommended Parts:
Controller Protection – Rubber BootThe boom lift and lower controller sees heavy use. Over time the rubber boot tears, allowing dirt and moisture into the controls.
Recommended Part: Structural & Appearance InspectionWhile checking decals, also do a quick visual check of:
Bottom Line for ContractorsSafety decals, the load chart, mirrors, and controller protection are relatively low-cost items that help keep the machine compliant and looking professional. On a 10-year-old SkyTrak 10054, these are easy wins that improve safety, reduce liability, and make the machine more presentable on job sites. Next week in Part 4 (Final Article): We’ll cover error codes, common faults, and diagnostic tools for the SkyTrak 10054. |
|||||||||||||||||||||||||||||||||||||||||
| Part 3 of 4: Safety Decals, Paint, and Appearance on Your 10-Year-Old 19' Electric Scissor Lift – Small Details That Keep You Safe | |||||||||||||||||||||||||||||||||||||||||
Part 3 of 4: Safety Decals, Paint, and Appearance on Your 10-Year-Old 19' Electric Scissor Lift – Small Details That Keep You SafeLast week in Part 2 we covered battery care — the single most critical maintenance item on your electric scissor lift. If you’re an electrician (or any contractor) who just bought a 10-year-old Genie GS-1930 or JLG 1930ES, this week we’re focusing on the “General” section of the inspection checklist: safety decals, placards, paint, and overall appearance. On a 10-year-old machine these items are easy to overlook, but they’re some of the first things an OSHA inspector or insurance auditor will check. Missing or faded decals can get you shut down on a jobsite, and poor appearance can signal that the machine hasn’t been well cared for. Why Decals and Appearance Matter on an Older Scissor Lift
Key Items to Check and Fix
OEM Decal Kits from gciron.com (Recommended)You can purchase decals individually or as complete decal kits. Ordering a full kit is usually faster and ensures you don’t miss anything.
Pro tip: Watch our quick YouTube video that walks through exactly how to remove the old decals and install the new ones → Visit our YouTube channel @GCIRON Paint and Touch-Up – Keep It Looking ProfessionalWhile you’re doing the decals, take time to touch up any chips, scratches, or faded areas. Fresh paint protects against rust and keeps the machine looking well-maintained. GCIron carries genuine paint for both brands: Bottom Line for ContractorsDecals and paint are relatively low-cost fixes (usually $250–$450 in parts plus a couple hours of labor) but they’re non-negotiable for staying compliant. Knock them out during your first annual inspection (already budgeted in Part 1). A clean, fully labeled 19' scissor lift tells your crew, your insurance company, and future buyers that this machine is taken seriously. Next week in Part 4 (final article): We’ll cover common error codes and user codes on the GS-1930 / 1930ES — what they mean and the quick troubleshooting steps before calling a tech. |
|||||||||||||||||||||||||||||||||||||||||
| Part 3: Safety Decals & Paint on 10-Year-Old 660SJ Boom Lift | |||||||||||||||||||||||||||||||||||||||||
Part 3 of 4: Safety Decals and Appearance on Your 10-Year-Old 660SJ Boom LiftLast week in Part 2 we covered the cylinder drift test and the two main seal kits you might need if it fails. If you’re a roofer (or any contractor) who just bought one of these machines, this week we’re focusing on the “General” section of the AWP inspection checklist — safety decals, placards, paint, and overall appearance. On a 10-year-old 660SJ these items are quick to check and fix, but they’re some of the first things an OSHA inspector or insurance auditor will look at. Why Decals and Appearance Matter on an Older AWP
Key Items to Check and Fix
OEM Decal Kits from gciron.com (Recommended)
Pro tip: Watch our quick YouTube video that walks through exactly how to remove the old decals and install the new ones. Paint and Touch-Up – Keep It Looking ProfessionalWhile you’re doing the decals, take time to touch up any chips, scratches, or faded areas. Fresh paint protects against rust and keeps the machine looking well-maintained.
GCIron carries genuine JLG paint in aerosol cans and gallon cans.
Bottom Line for RoofersDecals and paint are relatively low-cost fixes (usually $800–$1,800 in parts plus a few hours of labor) but they’re non-negotiable for staying compliant. Knock them out during your first annual inspection (already budgeted in Part 1). A clean, fully labeled 660SJ tells your crew, your insurance company, and future buyers that this machine is taken seriously. Next week in Part 4 (final article): We’ll cover common error codes and user codes on the 660SJ — what they mean and the quick troubleshooting steps before calling a tech. |
|||||||||||||||||||||||||||||||||||||||||
| Part 4 of 4: Diagnosing Issues & Common Faults on Your 10-Year-Old SkyTrak 10054 Telehandler | |||||||||||||||||||||||||||||||||||||||||
Part 4 of 4: Diagnosing Issues & Common Faults on Your 10-Year-Old SkyTrak 10054 TelehandlerOver the past three parts, we’ve covered what to budget for after buying a 10-year-old SkyTrak 10054, how to properly maintain the boom and hydraulics, and how to keep the machine compliant with proper decals and load charts. In this final article, we’ll focus on diagnosing problems and the most common issues seen on these machines. Where to Find Error Codes and WarningsOn the SkyTrak 10054, most warnings and fault codes are displayed on the instrument cluster (gauge panel) in the cab.
The display area in the center of the cluster is where error codes and system warnings will appear. Most Common Issues on 10-Year-Old SkyTrak 10054sHere are the three issues we see most frequently: 1. Code 418 – Water in Fuel WarningThis warning indicates water has been detected in the fuel system. It is often caused by contaminated fuel, a failing fuel/water separator, or moisture buildup in the tank over time. Fix: Drain the water separator and replace the fuel filter if needed. Persistent issues may require further fuel system inspection. 2. Code 3737 – Engine Starter Mode OvercrankThis code means the starter has been engaged too long without the engine starting. Common causes include weak batteries, starter or solenoid issues, or fuel delivery problems. Fix: Start by checking battery voltage and connections. Recurring issues usually require further diagnosis of the starting or fuel system. 3. Stabil-Trak System FaultsThe Stabil-Trak system is a safety feature designed to help stabilize the machine during operation, especially when the boom is raised. It works by limiting certain functions based on machine conditions. The system operates in three modes:
The system relies on input from several components, including boom proximity switches, parking brake switch, service brake switch, transmission selector, and related solenoid valves. When the system detects a fault, it can limit machine functions or display a warning. Common causes include faulty boom proximity switches, brake switch issues, transmission selector problems, or wiring/connection faults. How to Approach TroubleshootingWhen a warning or code appears:
Pro Tip: Don’t ignore recurring warnings. Even if the machine still operates, codes like 418 can lead to bigger problems if left unaddressed. If unaddressed codes will advance to codes 428, 429, and 1852 - most severe water in the fuel. Bottom Line for ContractorsA 10-year-old SkyTrak 10054 can still be a reliable machine, but it requires attentive maintenance and prompt attention when issues arise. The three problems we see most often — Water in Fuel (418), Starter Overcrank (3737), and Stabil-Trak faults — are usually manageable when caught early. Staying on top of regular service and addressing small problems before they become major repairs will help you get the most life and value out of the machine. Wrapping Up the SeriesOver the past four articles, we’ve covered the full process of turning a used SkyTrak 10054 into a reliable workhorse:
If you follow these steps and stay proactive with maintenance and diagnostics, you’ll have a much better chance of getting years of productive service while keeping repair costs reasonable. Thanks for following the series. |
|||||||||||||||||||||||||||||||||||||||||
| Part 4 of 4: Error Codes and User Codes on Your 10-Year-Old 19' Electric Scissor Lift – Quick Fixes Before Calling a Tech | |||||||||||||||||||||||||||||||||||||||||
Part 4 of 4: Error Codes and User Codes on Your 10-Year-Old 19' Electric Scissor Lift – Quick Fixes Before Calling a TechLast week in Part 3 we covered safety decals, paint, and appearance — the small but critical details that keep you compliant. If you’re an electrician (or any contractor) who just bought a 10-year-old Genie GS-1930 or JLG 1930ES 19' electric scissor lift, now that the machine is mechanically sound, freshly stickered, and looking sharp, let’s talk about the electronic side: error codes and user codes that pop up on the platform or ground controls. On a 10-year-old electric scissor lift these codes are very common. Most are simple to clear yourself and don’t require a full service call. Catching them early keeps the machine productive on the jobsite instead of sitting idle. Why Error Codes Show Up on Older MachinesAfter 10 years of jobsite use, wiring connections loosen, sensors get dirty or misaligned, and control boards occasionally need a reset. The control system is designed to display a numbered code (or “FAULT” message) to help you diagnose the issue fast. Must-Have Tools to Read and Clear Codes
Pro tip: Watch our two quick YouTube videos showing exactly how to use the JLG Analyzer: Most Common Codes and Quick Troubleshooting Steps
Pro tip: Many codes can be cleared by simply turning the key off for 30 seconds, then back on. If the code returns immediately, note the exact number and refer to the machine’s service manual. OEM Resources from gciron.com
All genuine OEM electrical parts, sensors, and wiring harnesses are stocked and ready to ship from www.gciron.com. Bottom Line for ContractorsError codes on a 10-year-old 19' electric scissor lift are usually not a big deal — most are fixed in minutes with basic checks. Address them during your first annual inspection (already built into the budget from Part 1) and you’ll keep the machine running smoothly on every job. Wrapping Up the SeriesYou now have the complete roadmap to turn your auction 19' electric scissor lift into a safe, reliable, and cost effective tool for your crew: Buy It → Make it Mechanically Sound → Make it Legally Safe → Make it User Friendly
Follow these steps and you’ll spend far less than renting a scissor lift for every electrical, drywall, or low level interior job. Thanks for following along; now go put that scissor lift to work. Safe jobs! |
|||||||||||||||||||||||||||||||||||||||||
| Part 4: Error Codes & User Codes on 10-Year-Old 660SJ Boom Lift | |||||||||||||||||||||||||||||||||||||||||
Part 4 of 4: Error Codes and User Codes on Your 10-Year-Old 660SJ Boom Lift – Quick Fixes Before Calling a TechLast week in Part 3 we covered safety decals, paint, and appearance — the small details that keep you compliant. If you’re a roofer (or any contractor) who just bought one of these machines, now that your auction 660SJ is mechanically sound, freshly stickered, and looking sharp, let’s talk about the electronic side: error codes and user codes that pop up on the platform or ground controls. On a 10-year-old AWP like the 660SJ, these codes are common. Most are simple to clear yourself and don’t require a full service call. Catching them early keeps the machine productive on the roof instead of sitting idle. The must-have tool to read and clear error codes is the JLG Hand-Held Analyzer & Cable Kit. Why Error Codes Show Up on Older MachinesAfter 10 years of jobsite use, wiring connections can loosen, sensors get dirty or misaligned, and control boards occasionally need a reset. The control system is designed to display a numbered code (or “FAULT” message) to help you diagnose the issue fast. Most Common Codes and Quick Troubleshooting Steps
Pro tip: Many codes can be cleared by simply turning the key off for 30 seconds, then back on. If the code returns immediately, note the exact number and refer to the machine’s service manual. OEM Resources from gciron.com
All genuine OEM electrical parts, sensors, and wiring harnesses are also stocked and ready to ship from www.gciron.com. Bottom Line for RoofersError codes on a 10-year-old 660SJ are usually not a big deal — most are fixed in minutes with basic checks. Address them during your first annual inspection (already built into the budget from Part 1) and you’ll keep the machine running smoothly on every roofing job. Wrapping Up the SeriesYou now have the complete roadmap to turn your auction 660SJ into a safe, reliable, and cost-effective tool for your roofing crew. Follow these steps and you’ll spend far less than renting a boom lift for every job. Thanks for following along — now go put that boom lift to work. Safe roofing! |
|||||||||||||||||||||||||||||||||||||||||
| How do I buy/redeem a gift certificate? | |||||||||||||||||||||||||||||||||||||||||
| To purchase a gift certificate for someone, click here. If you are the recipient of a gift certificate and would like to redeem your gift certificate, click here. | |||||||||||||||||||||||||||||||||||||||||
| How do I find my product? | |||||||||||||||||||||||||||||||||||||||||
| To find the product(s) you're looking for, you may (1) use the navigation menus on the top, left & bottom of our website. (2) type a keyword into the SEARCH box. If you have any trouble locating a product, feel free to contact customer service for assistance. | |||||||||||||||||||||||||||||||||||||||||
| How do I navigate the site? | |||||||||||||||||||||||||||||||||||||||||
| To navigate this website, simply click on a category you might be interested in. Categories are located on the top, left & bottom of our website. QUICK TIP: Place your mouse cursor over anything you think could be a clickable link. You'll notice that anytime you scroll over something that is a link, your mouse cursor will become a "hand". Whereas scrolling over anything that is NOT a link will leave your cursor as an "arrow". You may also type a keyword into the SEARCH box to quickly find a specific product. If you have any trouble locating a product, feel free to contact customer service for assistance. | |||||||||||||||||||||||||||||||||||||||||
| How do I use a coupon? | |||||||||||||||||||||||||||||||||||||||||
| After adding items to your cart, click the "View Cart" link at the top of this site to view your cart. At the bottom of the shopping cart you'll see a box where you may enter your coupon code. | |||||||||||||||||||||||||||||||||||||||||